|
|
ANDREW DE MORAY |
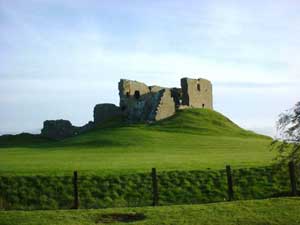
Andrew De Moray. - Scottish Patriot. 1273 - 1297. Atop a windswept cairn sited on the mound of Ormonde castle at Avoch (pronounced Auch') the national symbol of Scotland , the Saltire, flies proudly in perpetual commemoration of the raising of the North by Andrew de Moray during the wars of Independence some 709 years ago. Gathered round the foot of the flagpole, a crowd of patriots, some in period dress, celebrate Andrew's life and sacrifice. Who was this Andrew de Moray? Why are his actions worthy of commemoration today? The facts are sparse and tell us little beyond the fact he existed and did certain noteworthy things. Few documents and histories from that time exist and are often virtually inaccessible in University libraries and museums to the casual historian. Apart from providing dates and limited information we are very little the wiser. Therefore we are forced to use conjecture and oral tradition to flesh out the skeleton and reveal the real person and his great achievements. Andrew de Moray (modern parlance Murray ) came originally from a Flemish family, originating in Flanders ( Brabant ?) But latterly from Strabrock in west Lothian. The record tells us Freskin son of Ollec having received a grant of lands at Duffus (Gaidhlig Dubh Uisge = Black water very near to MacBeath's old hall-house at Spynie) at the invitation of King David 1 st of Scotland (1124 - 1153). (The name Freskin is a nickname meaning frizzy haired)
Among those early Moray records was mentioned one Freskin, son of Ollec being given the lands of Moray. Oral tradition tells us that Freskin and his son William married into the ancient royal house of the Moray Mormaerdom to ensure the reins of power were grasped firmly. Thereafter the family spread its influence through the province and even further abroad. One branch became Lords of Petty in Moray who later also became Lords of Bothwell in Clydesdale sometime before 1253. An heir of this line, Sir Andrew de Moray, the subject of this article, was the tactically brilliant young leader who led the Scots in 1297 in their first uprising against the English occupiers. He was later mortally wounded while leading the Scottish army in their famous victory at Stirling Bridge . Among Freskin's grandsons were; Hugo, First Lord of Sutherland and progenitor of Clan Sutherland; William, Lord of Petty and ancestor of the Perthshire and lowland branches; Gilbert, Bishop of Caithness and founder of the Sutherland branch; and Richard, a warrior who also founded the Sutherland branch. The senior branch became the Sutherlands, whereas the remainder adopted the Murray surname. Andrew de Moray was the elder son of Andrew de Moray and Euphemia Daughter of the Earl of Dunbar. The second son being William de Moray the 1 st of Drumsagarde. Andrew de Moray like most of his Norman Scots compatriots, would have been well schooled both educationally and in the science of warfare. It is most likely that he would have travelled to Europe to visit his relations in Flanders and further his education. Europe was riven with small wars during that time and he would have encountered Swiss and German mercenaries who had developed the art and tactics of warfare to new heights, especially the Swiss. Before we proceed any further in the light of what later transpires you will find a little note on the Swiss Mercenaries and mode of warfare at the end of the article. (see annex 2: ) Andrew de Moray's part in the Wars of Independence . Andrew de Moray would have studied and absorbed the tactics used by the Swiss mercenaries during his stay in Europe and by the time he returned to Scotland , he certainly would be a seasoned warrior and trained leader of men. Andrew's first experience of warfare in Scotland however was a disaster. He fought at the Battle of Dunbar in 1296 against the English army of Edward Longshanks.' Commanded by John de Warrenne, Earl of Surrey, himself a not very competent leader, but with highly seasoned commanders under his command. The English army had invaded Scotland and on March 30 th 1296 , the population of Berwick on Tweed were subjected to the horrors of massacre with some estimated 17,000 men, women and children being murdered in an orgy of rapine and bestiality designed to shock and cow the Scottish Nation into submission. The Battle of Dunbar 27 th April 1296 . The English then marched north towards Dunbar where the Scottish army under King John Balliol awaited them. The Scottish army is reputed to have been 40,000 strong as opposed to the 12,000 in the English host. I personally believe the figure of 40,000 is a gross exaggeration probably inflated by De Warenne to impress Edward 1 st . The true figure would more likely to have been around 14,000 including camp followers. It is inconceivable that one tenth of Scotland 's population would be in military service. (The Total population of Scotland at that time did not exceed 400,000 split equally between the Highlands and lowlands.) The Scots had the tactical advantage of high ground near Spottsmuir and this is where John Balliol proved his total incompetence as a military leader. He ordered his forces to charge down the hill towards the formed and disciplined English lines and De Warenne's waiting Welsh archers. What happened then was a massacre, the archers pouring volleys of arrows into the Scots leaving heaps of dead and wounded soldiers on the field. The Scots charge then wilted and paused. That is when De Warenne's mounted forces charged. The Scots began to flee and were in total disarray that allowed the mounted horsemen to destroy the remaining Scots. Few escaped and many nobles were taken prisoner including Andrew de Moray and his father Sir Andrew de Moray (Senior) and Uncle William de Moray. Andrew de Moray was imprisoned in Chester castle and his father and Uncle were incarcerated in the Tower of London where they eventually died of their privations. (Andrew de Moray Snr 10 th Nov 1300 and William de Moray of Bothwell sometime in the winter of 1298.) The Prisoner. Chester castle was an important strong-point on the Welsh border under the command of Hugh de Lacey 3 rd Earl of Lincoln who had fought at Dunbar . The Earl was heavily in debt to the crown as extant documents reveal and he took six Scots nobles prisoner for the purposes of ransom, one of whom was Andrew de Moray. The others being: Hugh de Lochore, Thomas de Moncrief, Patrick de Montalt, Matthew de Eyton, Alan le Mareschal. (Bain ii, p177) All the histories say Andrew de Moray somehow managed to escape from Chester Castle and make his perilous way north to Scotland . But is this the case? He would no doubt have written to his uncle David, a priest at Bothwell, (later to become Bishop of Moray in 1299) who oversaw a vast Cistercian see with extensive trading activities. I suspect that Andrew was ransomed but to avoid being the subject of Edward 1st's wrath, Hugh de Lacey pocketed the ransom and put it about that Andrew had escaped. It is recorded that he discharged a debt to the exchequer roll in April 1297. The Escape. This is what I suspect really happened. Uncle David despatched a trading vessel to Chester and his representative paid the ransom. Andrew was then smuggled on board the vessel which quickly (at least twice as fast as horseback) took him to a Cistercian establishment based at Inverlochy by the head of Loch Linnhe where he disembarked to make his way home on horseback, probably disguised as a novice monk. This is likely as travel on foot or horse through England and enemy occupied Scotland would have been very dangerous and foolhardy without a safe conduct pass. However this possible scenario is but supposition on my part. The Situation in Occupied Scotland winter of 1296 spring 1297. Scotland overall and especially the North was suffering greatly under the heavy hand of the English, headed by the likes of Sir Reginald le Chien (A Scots Norman), appointed Guardian of Moray and Sir William Fitz Warine, an Englishman appointed as Constable of Urquhart castle. The whole of Scotland was simmering in the spirit of revolt as the people recovered from the shock of being defeated and also because of the burden of crippling taxes and extortion of the high handed English tax collectors (escheators) and garrisons. There were small and usually disorganised local revolts flaring up all over Scotland although the Lothians recorded very few such. All it needed was a spark to start a full scale revolt in motion. For example in November 1296 Alexander of Argyll led a local revolt against an English garrison. The news reached Edward 1 st in the beginning of April (which gives one a sense of the poor communications.) Edward Wrote back on the 9 th April 1297 : To his faithful lieges of Argyle and Ross, commanding them to consult with and aid His chosen and faithful Alexander of the Isles, in putting an end to disorders in those parts. For certain malefactors and disturbers of our peace who wander through divers places in these parts and commit murders, burnings and other injuries against our peace, do you seek from day to day and do not rest until they are arrested and placed in safe custody (Rotuli Scottiae i.40,) Edward antagonised the Scottish Church by appointing many English Priests and Bishops to benefices with the intention of anglifying the Church in order to make the Scots accept English rule. This caused many of the Scottish Bishops and priests who under the leadership of Bishop Robert Wishart (another patriot whose story has yet to be told), to support the people of Scotland in their resistance. The revolt was sparked in three places by three men: Andrew De Moray, William Wallace and James Stewart who each lit the fires of insurrection. The Uprising in the North begins. Andrew de Moray returned to his family lands at Avoch in late April or early May to find Ormonde castle occupied by an English garrison. Raising his local levies he retook the castle and used it as a base to raise the north in arms against the English occupiers. Undoubtedly he had to spend some time in gathering arms (and the means to manufacture them) as well as training his levies in discipline and battle tactics. Although he was busy he was not so busy as to neglect getting married, which union was later blessed with a son also called Andrew, born on the feast of Pentecost ( 10 th June 1298 ) Seven months after Andrew de Moray died of his wounds. The uprising in the north led by Andrew de Moray.
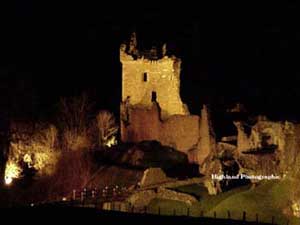
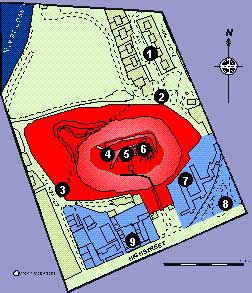
When Le Chein's message reached Edward, he struck a deal with some of the Scottish nobles held prisoner to support his hard-pressed forces in the North. Amongst them were John Comyn, Earl of Buchan, John Comyn of Badenoch, Alexander de Balliol, Alexander, Earl of Menteith and Reginald de Crauford. Incident on the 25 th May 1297 . Sir Reginald de Chein called for a conference of his subordinates at Inverness castle on 25 May, 1297 . Sir William Fitz Warine, the English constable of Urquhart castle, (See Annex 2.) travelled to the conference to discuss what action to take. When the conference ended, Sir William rode back toward Urquhart with his band of men at arms. Andrew de Moray and his forces ambushed Fitzwarine's party "by the old hill road which wound over the shoulder of Dunain and thence by way of the Caiplich..." Many English men at arms, squires and their mounts were killed, but Fitzwarine and some of his followers broke free and fled to the safety of Urquhart Castle . He left behind 18 captured warhorses and a number of men at arms either dead or prisoner. Reaching the safety of Urquhart castle was one thing but he was not out of the woods yet. Andrew de Moray quickly spearheaded what proved to be an unsuccessful night attack on the castle causing heavy casualties on both sides. Amongst the garrison's dead was the English constable's own son Richard Fitzwarine and his squire le Peur. Andrew then set about starving the garrison out, (He had no heavy siege engines.) On the second day the siege he was stymied by the approach of the forces of the Countess of Ross (whose husband was a prisoner of Edward 1 st ). She probably hoped to curry favour with Edward 1st by ordering her son to lift the siege and resupply the stronghold. Sir William Fitzwarine was suspicious and refused to allow her forces into the castle. However he did permit her to resupply the castle which she most likely did by boats to the Watergate of Urquhart castle. Andrew then lifted the siege and then took Balconie castle from the Countess of Ross which provided him with a secure strategic base from which to harry the English occupiers. The taking of Balconie Castle allowed Andrew to split his forces into two medium sized hard hitting guerilla bands under trusted lieutenants such as Alexander Pilche, a burgess of Inverness who became Andrews foremost military commander and second in command. His army was growing larger each day as many men from all over the North and East came to join him. The two castles at Avoch and Balconie provided tactical rallying and training points, also shelter for parties returning from Andrew's very effective guerrilla raids. Andrew de Moray's guerrillas continued to wreak much death and destruction and succeeded in destroying several small Pele's and motte and bailey fortifications and their garrisons. Each successful foray resulted in the capture of much needed arms and armour which was in short supply in the north. Iron was in short supply and it would take weeks even months to send ships to Europe to purchase Iron and weapons. The church was smuggling in great quantities of arms from Europe into the fife ports which William Wallace benefited from most of all. Sir William Fitzwarine managed to get a letter through to Edward 1 st telling him about the attack and their casualties. King Edward 1 st immediately wrote back giving orders that the castle be "so strengthened and garrisoned that no damage may in any way occur to it". It must have been the same messenger that took the news of his eldest son's death as it is recorded that his younger son Fulke Fitz Warine inherited the castle and lands of Stopfield in Shropshire and the barony just after that time. Investing (laying siege to) Inverness castle with half his forces under Alexander Pilche, to contain the movement of its garrison. (which was too strong for him to take at that time), Andrew de Moray with the other half of his forces, then started to reduce the castles occupied by the English in Moray. This was difficult because Inverness castle was powerful and exerted control over all the routes that led to Moray making it difficult to move men. However Andrew had other ideas and launched a masterpiece of strategy by successfully attacking Duffus castle which once belonged to his family but had been gifted to le Chein on marriage. In my opinion the only way this castle could have been taken was for Andrew to have landed his forces across the Moray Firth in boats landing in Spynie loch. This would have given him total surprise, something he would not have had marching his forces around Inverness . Immediately after taking Duffus he launched an attack on Boharme castle. Boharme (Nowadays called Gauldwell castle) was possibly the most strategically sited of all the Moray castles. Boharme was well sited in bogland and forest with the river Spey bisecting it and controlling the only ford across the river at Bellie. This capture effectively cut the northeast in two. With Boharme in his grip Andrew was then in a position to reduce the other Moray strongholds held by Le Chien leaving Inverness and Urquhart Castles impotent. Elgin Castle fell next followed soon after by the two remaining strongholds belonging to Le Chien. Confrontation at Ford of Bellie. It was about this time that Edwards relieving force arrived on the scene and the stage was set for confrontation. Andrew sited his forces on top of a wooded hillside overlooking the ford and planned to ambush the enemy column at their most vulnerable point as they crossed the ford at Bellie on their way to Elgin . The relieving force which was mostly composed of Scots nobles and footmen under Sir John Comyn, (A relative of Andrew) who themselves had a working knowledge of the area and were very alert taking extensive precautions not to be ambushed. The result was a standoff with both forces threatening action but unable to do so all the way to Inverness . In my view there must have been a tacit understanding between the two Scottish forces not to attack each other. With the relieving force safely contained in Inverness castle, Andrew then started reducing other Moray castles at Nairn, Forres and Culbin. Relief columns sent from Inverness were defeated thus steadily weakening the garrison. A Running battle at Culblein. There is an intriguing reference in a letter from Reginald le Chein to Hugo Cressingham to a skirmish at Culblein (Possibly modern day Culbin.) where a relief column was wiped out by Andrew de Moray's forces in late June 1297. A surprising development then occurred. Aberdeen had risen and taken the English held castle under Sir Henry de Latham who had, unknown to his men, changed side and delivered the castle into the hands of the Scots. The garrison tried to escape by sea but the ships were stuck in the harbour by the low tide and they were wiped out by William Wallace's forces who by this time had moved north. Bishop Henry le Chein, when hearing of the uprising, immediately sent word to Inverness asking for help to quell the uprising. From Inverness castle,. The Comyns and Gartnait, son of the Earl of Mar assembled their forces and set off for Aberdeen , unmolested by Andrew de Moray. The relieving force bypassed Aberdeen entirely and thereafter lay low in their Buchan strongholds doubtless sitting on the fence to see which side would win.
By the end of April, the English administration in Scotland was in disarray and virtually bankrupt. Writing from Northumberland in a letter dated the 10 th July 1297 Hugo de Cressingham, Edwards chief tax collector in Scotland , wrote to the deputy treasurer in London . He explained why the sum of £2,000 he had persuaded the King to send to him was urgently need in Scotland to meet expenses: Not one of the sheriffs, bailifs or official of the Lord King appointed within that kingdom can at this time raise a penny of the revenues of their bailiwicks, on account of a multitude of different perils which daily and continually threaten them. (Stevenson. Documents ii, no 447.) As the news from the north gradually filtered southwards, the parlous position of the English became clearer. Over a large part of Scotland , the English had no control, and in the remainder consisted of castle garrisons mostly unable to do anything except wait for relief. On the 24 th July Hugo Cressingham wrote again to King Edward 1 st thus: By far the greater part of your counties in the Scottish kingdom are still not provided with keepers because they have been killed, besieged or imprisoned or have abandoned their bailiwicks and dare not go back. And in some shires the Scots have appointed and established bailiffs and officials. Thus no shire is properly kept save for Berwickshire and Roxburghshire and they only recently. (Stevenson. Documents ii, no 917.) Edward 1 st did not sit on his backside. He assembled a large army consisting of men at Arms, heavy cavalry, foot soldiers and Welsh archers under the Earl of Surrey - de Warrenne and Hugo de Cressingham ( the grossly obese tax collector and possibly the most corrupt and hated man in Scotland). Called by the Scots The Treacherer.' After assembling the army at Lanercost Abbey, Edward 1 st left for Flanders to deal with more uprisings in his French territories. Andrew de Moray then proceeded to reduce all the remaining English held castles in the north and northeast whilst training and disciplining his forces, moving eastwards and southwards all the time. William Wallace, hearing about the assembly of a large English army on the border, immediately sent a message to Andrew de Moray to join him as soon as possible so that their united forces could challenge the English. Andrew then sped south on drove roads meeting up with Wallace at the five stones on the drovers meeting place (Now known as Sheriffmuir) near Perth in mid august. The Nobles decide to act. In the meantime ,encouraged by the reports of de Moray's and Wallace's uprisings the aristocracy, led by the former guardians of Scotland Bishop Robert Wishart and Sir James Stewart, decided that they too should join in and started to assemble their forces near Irvine . Amongst their number was one Robert de Brus who would later secure Scotland 's independence. Edwards immediate reaction was to send a large force under Sir Henry Percy and Sir Robert Clifford to surround the Scots nobles encamped at Irvine , where after lengthy negotiations they surrendered without a fight on the 7 th July 1297 on the condition that they did not have to go to France to fight for Edward 1 st . Despite the fact that the noble's revolt had been settled, the English still faced many grave problems. In a letter dated the 5 th August 1297 to King Edward 1 st , Hugo Cressingham wrote: The peace on the other side of the Scottish sea is still in obscurity, as it is said , as to the doings of the earls who are there. But at all events we hope that if our business succeeds well on the day of St Laurence (10 th August) as to the Bishop of Glasgow and the others, as far as the people on the other side of the Scottish sea are concerned, we hope soon to have them at our pleasure by God's grace. Sir Andrew de Rait is going to you with a credence which he has shown to me, and which is false in many points and obscure, as will be shown hereafter, as I fear; and therefore sire, if it be your pleasure, you will give little weight to it. (Stevenson. Documents ii, no 226/7.) The English army in the borders then moved north heading for Linlithgow in late August. Their progress was slowed down by an unwieldy baggage train. Their aim was to relieve Andrew de Moray's and Wallace's siege of Stirling castle, and then march on to Dundee which was being besieged by a small but substantial part of William Wallace's army under the command of the Burgesses of Dundee led by Alexander Scrymgeour. The Preparations begin . The combined forces of De Moray and Wallace had marched south to Stirling in late August and invested the castle. Knowing that a large English army was on the way north they selected a suitable battlefield on which to meet the much larger English army. Stirling controlled the last crossing place over the Forth before it widened into the estuary of the firth. A narrow timber bridge spanned the river and whoever controlled this bridge controlled most of the traffic north and south. The bridge crossed the Forth where there was a large loop enclosing an area of marshy ground with a few dry areas on each side of the road, (made up of logs and rocks). Using the land as an ally this area would enable them to neutralise the potent threat of the English men at arms. Marginal territory for foot soldiers perhaps, but impossible for heavy cavalry such as the English employed and was their main battle asset. High above the bridge stood the Abbey Craig on which De Moray and Wallace planned the strategy for the coming battle. The ground sloped down to the river which would add impetus to any charge. There was also extensive tree cover on the higher ground useful for concealment. The major problem was that the English army was nearly two times the size of the available Scottish forces and was too large to take on in open conflict. Some means had to be found to split the English army into two or three parts which could be taken on individually and destroyed one after the other. The Scots were outnumbered and had no more than 6000 spear men and warriors, 400 archers who were no match for the Welsh long bowmen and only 180 knights and light horsemen. They did have three schiltrons of disciplined spear men/pikemen (probably Moray's) The English on the other hand, according to Cressingham, possessed 10,000 foot soldiers (of which half were Welsh long bowmen) and 350 heavy cavalry plus the armies retinue of squires, camp servants and armourers whose numbers must have been around 4,500 making around 15,000 in total. There were two crossings to cover, the bridge and the ford two miles away. The Scots did not have enough to cover both so the combined Scottish forces lay up amongst the trees on the top of the Abbey Craig where English heavy cavalry could not penetrate yet they could react quickly to any force crossing either the ford or the Bridge. The bridge was narrow and could only take two horsemen riding abreast but the ford could easily take ten riding abreast thus making a quicker crossing. Having regard to Andrew de Moray's successful tactics in the north I believe he planned along with Wallace to cut the English forces in two, destroy the nearest portion and then advance and destroy the remainder. He had demonstrated the effectiveness of this tactic in Moray and now it was to be used again with devastating effect. Who was in command of the Scottish Army? This is an important question in the light of what subsequently transpired. I make the case that Andrew de Moray was in overall command due to his noble status outranking that of Wallace and the fact that the largest proportion (and the most disciplined and well trained) of the combined army were from the north. William Wallace was second in command. This is not to demote Wallace's status as a great leader of men and patriot, no one can take these accolades from him. Andrew de Moray outranked him and had a greater knowledge of battle tactics and was an original thinker able to take immediate advantage of his enemies mistakes. The lead up to the battle of Stirling Bridge . The English army arrived at the bridge 1n the evening of the 9 th September and encamped there while the leaders de Warrene and Cressingham assessed the position. It is possible that the baggage train was lagging behind protected by a considerable part of the English foot-soldiers, so they waited for their forces to be reunited before beginning hostilities. The following day whilst waiting, two Scottish Noblemen, James the Steward and Malcolm the Earl of Lennox were sent to parley with the Scottish Army. They were brusquely rebuffed and returned empty handed. De Warrene then sent two Dominican friars to parley with de Moray and Wallace and they fared little better, at least they got an audience only to be told: Tell your commander that we are not here to make peace, but to do battle, to defend ourselves and liberate our kingdom. Let them come on, and we will prove this in their very beards. (Chronicles of Guisborough, 300.) These words have been attributed to William Wallace. However it is more probable that they were uttered by Andrew de Moray. If so we have a posthumous quotation which reveals the true spirit of the man . The English baggage train with the rearguard of the army arrived that afternoon. With them were messengers from Clifford and Percy telling de Warrene that their forces would be with them in a days time. The messengers were promptly sent back by Cressingham to tell Percy and Clifford their forces were not needed and were a drain on the Royal purse. They were ordered to retire to Carlisle and disband their forces. This trait of parsimony would cost Cressingham very dearly the following day. The day of the battle 11 th September 1297 . De Warrene (the Earl of Surrey) and Cressingham gave orders for the English Army to cross the bridge at dawn. After a good number had crossed over de Warrene who had overslept countermanded that order. In the late morning, he and Cressingham advanced to the bridge to view the Scottish Army lined up half a mile away near the Abbey Craig.
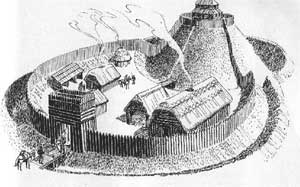
The Earl of Surrey reluctantly agreed and the vanguard of foot soldiers crossed and deployed to protect the mounted men at arms as they crossed. Cressingham with a north Yorkshire knight - Sir Marmaduke Twenge led 140 men at arms across the bridge followed closely by more foot soldiers. The crossing was very slow and it was not until early afternoon that a considerable portion of the English army were across. What went through the minds of the Scottish commanders is not known. They must have watched incredulously, not believing their luck as the English walked right into their trap. The English men at arms with their squires were strung out along half a mile on the raised causeway of stones and logs. The foot-soldiers in position on both sides in the wetlands. When it was judged to be the right moment, hordes of pike and spear-men under Andrew de Moray charged down the slope and cut the English army in two at the bridgehead and holding the bridge with a large Schiltron in hedgehog formation. Most of the English were trapped inside the loop of the river, a deadly killing ground indeed. There was a high tide in the River Forth with strong currents and water up to 20 feet deep on three sides, marshy, boggy banks with little firm ground for the horses. The roadway of logs and stones was raised above the marshy ground and this is where the English men at arms mustered. For the English densely packed within the loop it was either fight and die or escape by swimming. Once Moray's men were in position Wallace then committed the rest of his men in a wild charge right into the packed ranks of the English, then followed a hour long but victorious battle that saw the English utterly destroyed. Cressingham at the head of the men at arms charged the Schiltron but swerved away at the last minute. According to his squire who survived, Cressingham was so overweight that he lost his balance in the turn and fell off his horse. He was finished off with a spear thrust in his throat. The squire escaped by swimming the Forth . Sir Marmaduke Twenge then led the horsed men at arms and charged at the spearmen holding the bridgehead, cutting his way through and managed to cross the bridge along with another 14 men at arms, but at a terrible cost. Over one hundred men at arms, the flower of England 's chivalry, including Sir Richard de Waldegrave, Constable of Stirling Castle, were unhorsed and slaughtered, a few more were captured to be later ransomed. Over 5,000 English foot soldiers perished in the rout with an estimated 1,700 Scots making the ultimate sacrifice. Andrew de Moray was a leader who led from the front, and he would have been in the thick of the fight leading by example. It was probably about the time the English chivalry were destroyed that Andrew de Moray received the wounds that later proved to be mortal, (one report states that he sustained an arrow wound, but others state he received multiple sword wounds,) but he would have known the battle was won. Some surviving English foot soldiers attempted to swim the river to escape the slaughter, a few made it but many more drowned, those wearing armour had no chance. The Earl of Surrey ordered that the bridge be destroyed and burned. (It should be noted that tradition has the Scots destroying the bridge but this is unlikely as this would have prevented them from following up and engaging the retreating English.) Sir Marmaduke Twenge supervised the dismantling of the English held end and made sure the timbers were burned so that they could not be used for rebuilding. The Earl of Surrey then appointed Sir William Fitzwarine to take over as constable of Stirling castle with Sir Marmaduke Twenge as second in command. By this time the surviving English were in a demoralised state and The earl of Surrey ordered the surviving portion of his forces retreat to Berwick. It should be noted that the Earl of Surrey also led from the front, the front of the retreat! It is recorded that he rode his horse so hard that it foundered at Berwick and never ate corn again. The victorious Scots found Hugo de Cressingham's corpse by the bridge and it is recorded that William Wallace ordered that his skin be flayed and cut into small pieces which were to be nailed to the doors of every parish church in Scotland . The man who had skinned them of their wealth had himself been skinned. This was a clear and unmistakable message that English rule in Scotland was no more. His actions are understandable, Cressingham was the most hated man in Scotland , Edwards toadying comptroller, a man so monstrous that he out Heroded Herod in his cruelty to curry favour with Edward 1 st . The Surviving English and their baggage train only got as far as Falkirk . James the Steward, the Earl of Lennox along with their retinue of nobles and retainers then opportunistically changed sides and massacred many of the English survivors and captured the rich baggage train. This was then presented to Wallace to prove their bona fides. In the meantime Andrew de Moray was found lying amongst the slain, grievously wounded. (Fordun The Scotichronicon.) He would most likely have been taken to Cambuskenneth Abbey for immediate medical treatment. This must have been partially successful as we next hear of Andrew de Moray in Haddington on the 11 th October 1297 when he signed letters to the Merchants of Lubeck and Hamburg . The Lubeck letter has survived with its seals and reads: Andreas de Moravia and Willelmus Wallensis, leaders of the army of the Kingdom of Scotland, and the community of the same Kingdom, to the prudent and discreet men and well beloved friends , the mayors and commons of Lubeck and Hamburg, greeting and increase always of sincere friendship. It has been told to us by trustworthy merchants of the said kingdom of Scotland, that you of your own goodwill are giving your counsel, aid, and favour in all matters and transactions touching us and the said merchants, although our merits had not deserved this; and so all the more are we bound to you, to give you our thanks and a worthy recompense, whereto we willingly engage ourselves to you; and request you that you will be pleased to make it known among your merchants that they can have safe access to all the ports of the Kingdom of Scotland with their merchandise; for the Kingdom of Scotland, God be thanked, has been recovered by war from the power of the English. Farewell. Given at Haddington in Scotland on the eleventh day of October in the year of grace one thousand two hundred and ninety-seven. We further request you to have the goodness to forward the business of our merchants John Burnet and John Frere, according as you wish us to forward the business of your merchants. Farewell given as before. Andrew de Moray and William Wallace were informing the merchants that it was business as usual and also to thank them for all the aid and support they had given during the struggle, especially for the shipments of arms, armour and iron without which the war would have been all the more protracted. Exactly a week later, the Scots invaded England . Although there is only circumstantial evidence I believe Andrew de Moray despite his weakened state, marched with them when he could quite honourably have stayed at home to recuperate. A month later his name is affixed to a protection issued to the monks of Hexham priory. It begins: Andreas de Moravia and Willelmus Wallensis, commanders of the army of the Kingdom of Scotland, in the name of the Lord John, by God's grace illustrious King of Scotland, by consent of the community of that realm, giving greeting to all of that realm to whom the present letter shall come. We inform you that in the name of the king we have duly received into the firm peace and protection of the king and of ourselves the prior and monastery of Hexham in Northumberland, with their lands, and their men, and all their possessions, and their property, moveable and immoveable. Therefore we strictly forbid anyone to presume to inflict on them, in their persons, lands, or belongings, any ill, interference, injury, or hurt, on pain of incurring full forfeiture to the king himself; or to cause the death of them, or of any one of them, on pain of loss of life and limb. Hexham, 7 November . ( the chronicle of Walter of Guisborough ) There was also another document ascribed to him and Wallace on the same date, implying that he was at Hexham. My grounds for believing Andrew de Moray was at Hexham was the fact that his personal seal was attached to these documents implying that he must have been physically present at the time. It must have quite soon after the 10 th November 1297 that Andrew de Moray died. No doubt he was weak from his wounds and totally exhausted with nearly a months hard campaigning. In those circumstances even the cold and dampness could have been the final straw and his weakened body gave up the uneven struggle. Facts are sparse but we do know that his body was taken north to the Cathedral in Fortrose. Due to the long distance involved it is likely the soft internal organs would have been removed and buried in consecrated ground. The body would have either been embalmed or smoke dried in a kiln before being wrapped for transport either in a slow horse litter or taken on board a ship for a quicker passage to Fortrose. Summary. Before I started this research, what I knew about Andrew de Moray could have been written on a postage stamp. After seven months I feel as if I have come to know the man and my admiration of him has increased by leaps and bounds. Andrew de Moray came from the Norman Scottish ruling class which held many things and ideas in common with the Norman English to which many of them were related through blood. It would have been very easy for him to have submitted to Edward 1 st and accept preferment's and privileges as so many Norman Scots did. It is to Andrew's great credit that he did not submit, instead he managed to return to his father's lands and raise the flag of insurrection. To many of his class, his actions must have appeared suicidal doomed in taking on the mightiest military machine in western Europe. Yet take on the might of Edward's army he did, and succeeded against all the odds. His forces were pitifully armed at first. Weapons and armour would have been in short supply and his followers would probably have been armed initially with clubs, knives, hunting bows and agricultural implements. He started his guerrilla campaign by attacking small foraging parties, tax collectors and the like, small in numbers. Gradually Andrew de Moray would have accumulated a sizeable armoury of arms and armour. Broken weapons would have been salvaged and remade into other weapons by the local smiths. Once there were enough weapons then he would have trained his men into the most effective ways of using them. He would also have imposed strict discipline and built up their morale to the point that they knew they were capable of winning any battle. Andrew was a brilliant battlefield tactician who also could visualise the strategy required over a wider area. He quickly imposed his will on the English garrisons in the north and put them on the defensive. He held the initiative at all times and was greatly respected by his foes. Letters sent to Edward 1 st certainly give this impression. The English chroniclers of that time placed Andrew de Moray second only to Bishop Robert Wishart as the most important leader of the uprising. Edward 1 st must have thought likewise because he regarded him as a highly dangerous enemy. He gave instructions that Andrew's father and Uncle be given harsh treatment in the Tower of London . So harsh in fact that both of them died in the Tower. His grasp of strategy is best revealed when after liberating the area north of the Moray firth , he struck first at Duffus castle and then took Boharme castle the following day. He had effectively cut Moray off from any relief columns sent from the east. Later on he made good use of cover to neutralise the mounted advantage of the relieving forces under the Earl of Buchan. He knew when and not to make an attack, thus conserving his forces. To take 4 major stone built castles and at least 15 motte and bailey timber fortresses plus possibly another 20 plus pales in a three month period, is no mean achievement for a guerrilla leader. Judging from the available evidence, it is most likely that Andrew de Moray was in overall command at Stirling Bridge . His command of strategy and tactics was far superior to that of William Wallace and in no way denigrates Wallace's great achievements. Wallace's dispositions at Falkirk a year later reveal his poor tactical knowledge. Andrew de Moray would never have fought at Falkirk . Furthermore Wallace was unable to exert tight discipline during the expedition into northern England . His men ran amok and that is very noticeable soon after de Moray died which leads me to believe Andrew de moray was on that expedition. At Stirling Bridge , Andrew commanded the only disciplined force on the Scottish side. His schiltron seized the bridge-head and held their ground against the much feared and deadly English heavy horsed men at arms and destroyed them. It is inconceivable that Andrew de Moray would have stood idly by while his men fought. He was at the front of his men fighting alongside them as Wallace and Bruce did. The fighting was intense and severe and it is no wonder that Andrew de Moray was found severely wounded amongst the slain.' Despite these wounds he was able to take part in the governance of Scotland as joint governor with William Wallace. He did not stint himself and continued to consolidate the victory over the English occupiers despite his weakened state, leading to his early death. Andrew de Moray is the greatest of the unsung heroes of the Scottish wars of Independence and it is to be regretted that there is no memorial to his deeds and memory except for the cairn and flag flying over the ruins of Ormonde castle at Avoch. Acknowledgement of his contribution is long overdue and I would like his name become familiar with all Scotland 's school children as much as William Wallace is as well known. ******************************* I am also researching the lives of other virtually unknown people who played an important part in the wars of Independence . People such as Angus Og MacDonald, Bishop Robert Wishart, Archbishop William Lamberton, Bishop David of Moray, James Douglas, Gilbert Hay, Robert Keith, James Stewart, Thomas Randolph, and finally one woman Christina Nic Ruaraidh. ******************************* Annex 1. An explanation of terms relating to fortifications. In 1297 there were three types of fortifications, namely The Pale (or Pele) Motte and Bailey and the stone built castle. The Pale. The most basic fortification was the Pale which was an area enclosed by a timber curtain wall. Firstly a mound would be created or an original eminence like an old hill fort being utilised. Trees would be felled to create the walls which would have had a walkway with lookout towers and one or more gate-houses. Barracks and other buildings would reside within the curtain wall. The design is similar to the Roman military encampment. The Timber walls would normally, but not always, be covered with a thick coating of clay to prevent the timber walls being set on fire with fire arrows but they were vulnerable to a really big conflagration which would cause the clay coating to fall off thus exposing the timber wall to the fire. If the fire could not be put out then a breach would occur and the fortress could fall to the attackers. There were a number of Pales in Moray of which Rait castle is a prime example. They would have had a garrison varying from 30 men upwards of 80. They were designed to impose the authority of the feudal lord over his serfs but were not strong enough to resist a determined uprising. Andrew de Moray's forces are believed to have destroyed over 20 Pales in a three-month campaign (My calculations). The Motte and Bailey.
The Stone built Castle.
Swiss Mercenaries. The Swiss fought in a deep phalanx, Greek style with long pikes of about 4 metres in length. The pikes of four ranks of pikemen were projected beyond the first rank. As one fell, another moved up to take his place. Every unit had its flags, banners and pennons of town, guild, canton, etc. They were adept at manoeuvre, capable of forming several tactical formations at a moment's notice. Swiss armies formed up in three lines thus: Where the first rank and second advance while the third was held in reserve. Thus if either the first or second were repulsed, it could withdraw without disrupting the other. They also fought in single column and in a hollow square or circle, called the "hedgehog". An alternative name is the Schiltron* This tactic was used with catastrophic effect by Andrew de Moray and William Wallace at Stirling Bridge and later on by the British Army during the Napoleonic wars with truly devastating effects on the French army. The pike was the favoured weapon of Swiss infantry. 4 metres and sometimes 6 metres long with a blade, a point and a hook. The Swiss pikeman in the front row, knelt and held his pike shoulder high, angled slightly to drive up and into the horse which was the most vulnerable target. Once the charge was broken, the hook was used to pull the knight from his horse, then blade or point finished him off (or else they used a poleaxe, mace or dagger). * The word Schiltron' is first recorded around 1000 AD and derives from German/Saxon roots expressing the idea of a Shield-troop'. Stirling Bridge . The Romans were the first to build a bridge in this location. They had built a road and a causeway across the boggy wetlands beside the forth ending at their major encampment at Gask. Ref http://www.britarch.ac.uk/ba/ba67/feat1.shtml After the Romans left Scotland , the bridge was either destroyed or allowed to fall into decay. However the need to replace the bridge was obvious especially in winter when water levels in the forth made the fords virtually unusable. The raised causeway of stone and logs gave a sure roadway in bad weather allowing the relatively quick movement of troops and baggage trains. It made sense to have a bridge across the Forth at that point. In 855 AD Donald V came onto the throne and it is believed that he ordered the bridge to be rebuilt. Being timber the bridge had a short life needing repair and often replacement. MacBeath had the bridge destroyed in 1055 to prevent Earl Siward's Northumbrian and Danish mercenaries crossing the Forth . It was then rebuilt a few years later by Malcolm Ceannmor. The Timber bridge existing in 1297 was built by Alexander 2nd and strengthened by Edward 1st of England who knew the importance of good communications.
Niall Aslen. Cairnbulg. 9th April 2006 . |

|